Saturday, April 17, 2010

Nature textures with Gerhard Richter


Kindergarten-Second Grade

PREPARATION: thicken blue and green paint with flour

DISCUSSION:
Show several of Richter’s Abstract Art work
What do you see?
Does it look like a photograph? It is an Abstract
What does it make you think of?
Water reflections
Tree bark
Evoke textures of natural objects: reflections, shadows
What tools do painters use?
Canvas, brush paint
Where do you see layers of paint?
What order do you think he painted them in?
How do you think he created these effects
Layers of paint scraped with a squeegee
Can an artist start a painting without knowing what they are going to create?

ARTIST:
Gerhard Richter (born February 9, 1932)
German visual artist.
Known for his blurred painting of photographs
Known for abstract paintings of pulled paint

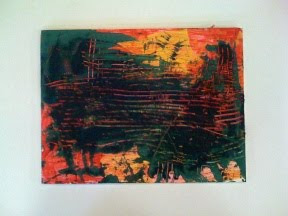
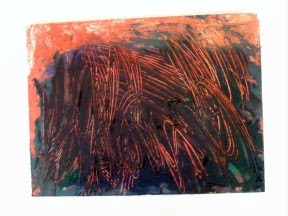
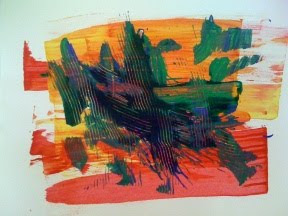
PROJECT: Create a Richter inspired piece of art on Foam Core
Step1: using a sponge paint on your foam core using warm colors provided
Step2: Turn in sponges
Step3: gather painting materials: card board cut in small pieces , plastic forks
Popsicle sticks, etc.
Step4: using thickened greens and blues apply paint with cardboard squeegees
Step5: using forks and sticks scrape into the paint reveling the warm tones underneath
Step6: look at your work and see if you can find a texture that you see in nature.

MATERIALS:
Thicken blue and green paints
Warm Paints
Cardboard squeegees
Plastic forks and sticks
Foam core
Sponges

Adaptations: this project would be a great one for warm and cool color exploration.

This project was a really great way to expand the kids ideas about different ways we can create artwork. It was so much fun to experiment with different painting utensils. The kids had a blast and the results were amazing!!! Thanks to my friend Kerry for such a great lesson plan!!!

Repetition and shading Gumballs with Wayne Thiebaud


Kindergarten-Second grade

DISCUSSION: repetition
What does it mean to repeat?
Show one of Wayne Theibaud's Gumball Machines
Where do we see repetition in this artwork
Where else?
What does this piece of art make you think of?
Where would you see one of these gumball machines in life?
How does the gum taste? Does each color taste different?
Do you see where the light hits the gumballs inside the glass?
How did Mr Thiebaud create light?

ARTIST: Wayne Thiebaud
(November 15, 1920- )
He is an American painter
whose most famous works are of cakes, pastries, boots, toilets, toys and lipsticks.
He is associated with the Pop art movement because of his interest in objects of mass culture,
although his works, executed during the fifties and sixties, slightly predate the works of the classic pop artists.
Thiebaud uses heavy pigment and exaggerated colors to depict his subjects
well-defined shadows characteristic of advertisements are almost always included in his work.

PROJECT: draw a gumball machine and collage in the gumballs
Step1: WORKING TOGETHER: draw a square at the bottom of your page
Step2: Draw in a small oval at the bottom of the square
Step3: draw a rectangle at the top of the square
Step4: Draw a large circle on top of the rectangle
Step5: using oil pastels: color the square red
Step6: color the small oval black
Step 7: shade in with black on the right side of the square making a shadow. Make
the shadow run off the page in the style of Mr. Thiebaud
Step8: Add lines on the rectangle
Step9: cut out circles from collage papers and glue them inside gumball machine
Step10: continue until you have five minutes left
Step11: using white oil pastel add in the white highlights on the gumballs

MATERIALS:
White construction paper
Oil pastels
Scrappy construction papers

Friday, April 16, 2010

Picasso robot line drawings in scratch art


Kindergarten-Second Grade

Two Week Project

DISCUSSION: Pre art: preparing to create artwork
What are some things you need to create artwork?
Materials: paint, markers, paper
Clay how do you make it? How do you reclaim it when it hardens?
Paper mache how do you make it? Can you buy it?
Printmaking how do you make the print?
SCRATCH ART? Where do you get it?
Can you make it?
How do you go about deciding where to place the different colors?
Pattern? How will it look when I scratch it off?
Under colors what are they?
APPLY THE COLOR ALL OVER AND VERY THICK!!!!

PROJECT: Create scratch art paper for next weeks project:
Step1: with oil pastels decide on a pattern for your under colors
Step2: after you decide how to pattern and place your colors begin putting them on the page
Step 3; paint one coat of black paint on top of your paper

MATERIALS:
Tag Board
Oil pastels
Black paint mixed with dish soap.

Week 2:
DISCUSSION: blind contour drawing
What do you think it means
why would an artist choose to draw that way
are your results going to be perfect?
Show one of Picasso's Line drawings
what do you see
does it look like a photograph
are the lines perfectly straight
does it look like he was looking at his paper or the object he was drawing?

Have the kids practice many times on scrap paper. Keep all their work in their portfolio. You never know what a little blind Contour drawing might inspire for an Art Show.

We did Blind Contour Drawing of one of my son's robots. I set up the tables in a semi-circle so everyone could see the robot very well. We followed the rules of blind contour and the kids had so much fun.

Blind Contour Rules:
Continue to draw for the full time given
Never pick up your pencil
Never look at your paper

FINAL DRAWING is on the scratch paper we made last week

ARTIST: Pablo Picasso
1881-1973
known for cubism
painter, sculpture printmaking, theatre design posters
line drawings are continuous

PROJECT: complete a blind contour drawing of a robot on scratch paper
After trying Several one minute blind contour drawings of the robot
Step1: draw your FINAL blind contour robot drawing on your scratch paper
Step2: When the minute is up compare the real robot with the robot drawing
Step3: Add additional details into the robot
Step4: add details in the background, could be stars or dots or stripes.

MATERIALS:
Tooth pick

Thursday, April 15, 2010

Creating Relief Sculpture Glue Drawings with a Studied Artist


Second -Fifth Grade

TWO WEEK PROJECT great for the end of the year

Discussion
Recap all artists we have studied and show their work on the board
Discuss relief sculpture. Raised sculpture on a flat surface
Most often seen on the side of a building
Show students photographs of examples of relief Sculpture
Do they see a story in the sculpture?

PROJECT: On tag board Create a glue drawing
Step1: decide which artist you want to revisit
Step2: using a pencil draw a quick drawing using your artist as inspiration
Step3: go over all your pencil lines with glue
Hold your glue bottle like a pen and make sure you have go lines to leave behind
Step4: place it to dry

WEEK TWO:
Paint the tag board with a metallic paint
Step1: decide what color you want to paint your artwork
Step2: using a brush paint over the glue
Step3: leave a half an inch around your paper white
Step4: let it dry for a few minutes
Step5: finish anything left undone (shrinky dinks, sculpture)
Step6: using thick black or shoe polish paint, rub over the glue with a cotton ball
Step7: this will give it an antique look

MATERIALS:
tage board
Glue Bottles

WEEK TWO
Thick black paint OR shoe polish
Cotton balls

This project is perfect for the end of the year because 1: you can recap all the artist's you have studied and prepare your students for the art show. 2: there are so many little things to finish at the end of the year. None of these little projects will fill an hour but three little things keep everyone happy making art.

Picasso Cubism Cup Scultures


Second-Fifth Grade

TWO WEEK PROJECT

Discussion: Cubism/perspective/emotion
What does cubism mean?
How do things look from an airplane?
How small are the trees in the park from here? Can they fit in your fingers?
And standing next to them how much could we fit in our fingers? One piece of bark??
PERSPECTIVE: how you see things from where you are
In this classroom: some of you are looking at this half of my face and some at this half
Cubism means to draw things from several perspectives in one space
PICASSO and a fellow artist pioneered this idea.
Picasso would draw one face but show it from profile and forward.
Emotion: how color, music, life make you feel
If you are in a bad mood do you think you would paint the same thing if you were
in a good mood?
What about music? If you are listening to your favorite song/artist do you think you would paint the same thing as you would if you were listening to your Least favorite?
Picasso included emotion in his pieces deciding on colors and images based upon how he felt about them or in the moment.

ARTIST: Pablo Picasso
(25 October 1881 – 8 April 1973)
He was a Spanish painter, draughtsman, and sculptor.
He is one of the most recognized figures in 20th-century art.
He is best known for co-founding the Cubist movement and for the wide variety of styles embodied in his work. Picasso demonstrated uncanny artistic talent in his early years,
He painted in a realistic manner through his childhood and adolescence;
During the first decade of the twentieth century his style changed as he experimented with different theories, techniques, and ideas.
Picasso’s creativity manifested itself in numerous mediums, including painting, sculpture, drawing, and architecture. His revolutionary artistic accomplishments brought him universal renown and immense fortunes throughout his life, making him the best-known figure in twentieth century art.

PROJECT: create a clay cup with Picasso face
TO ATTACH ITEMS TO YOUR CLAY: score and SLIP them into place (demonstrate how to
score and slip for the students
Step1: roll your clay around in your hands until you create a perefct ball
Step2: pick a spot at the top of your ball and push both thumbs against the clay
Step3: Begin to go around in a circle with thumbs on the inside of the clay and fingers on the outside
Step4: continue until you have a pinch pot in the shape and size of a drinking cup
Step4: Use your extra clay create facial features: eyes, nose, lips, ears
Step5: attach eyes: one forward and one sideways
Step6: attach a nose but maybe it is upside down or on the cheek
Step7: attach a mouth but maybe it is on the forehead or sideways
Step8: don’t forget hair you can add it with your toothpick using texture

MATERIALS:
Clay
Toothpicks

WEEK 2:
Give the students acrylic paints and have them paint their cups. Ask them to spend time on each object of their face and to paint all of their sculpture: back front and even the inside.

These pieces were made from clay, allowed to harden and painted with acrylic paints. This lesson is easily adapted to firing and glazing.

Symbols with Robert Indiana


Second-Fifth Grade

DISCUSSION: symbols: what are they?
Where do we see symbols everyday?
Restrooms
Hwys
Road signs
What does a heart symbolise? Light bulb?
Why do we use symbols?
Can letters become symbols?
What artist gave us that idea?

Show Robert Indiana's Artwork Love
What do you notice about the sculpture?
Does it make a word?
What could the O be saying?
Is the O a symbol of something bigger?

ARTIST: Robert Indiana
1928-
American Artist
Associated with POP art
born in New Castle, Indiana.
His family relocated to Indianapolis
He moved to New York City in 1954 and joined the pop art movement
using distinctive imagery drawing on commercial art approaches blended with existentialism,
He gradually moved toward what Indiana calls "sculptural poems"
Indiana's iconic work LOVE was first created for a Christmas card for the Museum of Modern Art in 1964
New Hope sculpture designed in 2008 for the democratic campaign

PROJECT: Using four letter word create a sculptural poem on paper
Step1: choose a word could be the same as Indiana Love, hope,
Step2: Use a pencil to create block letters and construct your word sculpture
(REMEMBER INDIANA FLIPPED HIS O TO MAKE HIS STATEMENT)
Step3: decide how you might fill in your letters INDIANA USED FOUR COLORS
Step4: begin to fill in including the background

MATERIALS: tag board
Markers
Oil pastels
Pencils

Night Cityscapes with Paul Klee


Second-Fifth Grade

DISCUSSION: pattern with shape
What is pattern? What makes something a pattern? Repetition.
Where do we see pattern: wrapping paper, clothing, wallpaper
Do we see pattern in this room? Do we see pattern in art? Fiber art?

Show one of Paul Klee's Cityscape's
Talk about the repetition of shapes
What shapes do you see in this piece
Do Colors and shapes repeat?
Do you see a pattern?

ARTIST: Paul Klee
1879 – 1940)
Swiss painter of German nationality.
His highly individual style was influenced by movements in art that included expressionism, cubism, and surrealism.
Klee was a natural draftsman who experimented with and eventually mastered color theory, and wrote extensively about it.
His works reflect his dry humor and his sometimes child-like perspective, his personal moods and beliefs, and his musicality.
He and his friend, the Russian painter Wassily Kandinsky, both taught at the German Bauhaus school of art and architecture.

PROJECT: Create a cityscape using pattern paper (wrapping paper scrapbook paper)
Step1: 12x18 black paper
Step2: splatter orange and yellow paint on the background at a paint table
Step3: Cut rectangle shapes for buildings in all different heights and patterns
Step4: glue down your city
Step5: add details: toppers, windows, doors, etc.

MATERIALS:
Black paper
Paint
Brushes
Scraps of gift wrapping paper or scrap booking paper
Scissors
glue

This project was inspired by one I saw on deepspacesparkle.com

VALUE CIRCLES WITH KANDINSKY


Second-Fifth Grade

DISCUSSION: Color, Value:
Dominant color: Show a piece of art with one dominant color
Ask the students:what is the dom. Color?
What does the word dominant mean?
Do you like this piece?
How does it make you feel? Is it comforting?
Show another piece of art with a different dominant color
What is the mood
What is the dom. Color? Is it warm or cool? Does that add to the feeling?
VALUE: adding white to a color: tint
Adding black to a color shade
Value Scale: Show a value scale or create one on the board for the students to see.
Monochromatic: what does this word mean?
The word Mono means One and Chromatic means color. One color.

ARTIST: Wassily Kandinsky his work is in Wednesday class lesson plans
1866-1944
Russian Painter
Taught art in Munich Germany for ten years
Moved to Paris in 1933 became a citizen in 1939
He was excited by COLOR as a child
He related painting to playing music
Credited with painting the first modern abstract

PROJECT: Create Monochromatic Value Kandinsky circles on your page
Step1: choose a color. Get that color and black and white on your plate
Step2: with a pencil: draw circles on your page the size of your fist. Leave space between
Step3: repeat until you have 12 circles
Step4: draw smaller circles inside each large circle
Step5: Add black to your color and paint the background first
Step6: add white to your color and paint in a few rings
Step7: add more white to your color and paint a few more rings
Step8: continue until your finished

MATERIALS: paint
Brushes
Pencils
Water

Organic and Geometric shapes with Matisse


Second-Fifth Grade

Discussion: Geometric and Organic shapes
Have a few of Matisse's artworks that illustrate both geometric and organic shapes.
Geometric shapes: what are they?
Why are they called geometric?
Where do we see them in life everyday?
How do they help us get to school?
have you used the word geometric in your math class?
Organic shapes: name one in this classroom?
Where are they in nature everyday
Why are they called organic?
Where do we hear the word organic used a lot?

ARTIST: Henri Matisse
(1869-1954)
French Painter,
Studied law until he was 21
Mother gave him a paint box after surgery and he discovered painting
He returned to work, and every morning before work, he attended drawing classes; at lunch time he would paint for an hour or so, and then return to work. After work he would paint till night fell. It was his life.
In 1891 set off for Paris.
Matisse began his journey of studies which ultimately lead him to his love of line, shape and color.
Matisse felt that his greatest influence had been the work of the artist Cezanne (1839 – 1906, French).
In the 1950‘s, Matisse began creating paintings using paint and paper cut outs.
In his last years, as he aged and fell ill, Matisse continued to paint, this time on the walls of his room, using a piece of charcoal attached to the end of a bamboo pole. He painted until his death in 1954.
Matisse had strong feelings about only one thing, the act of painting.
The purpose of these pictures, he always asserted, was to give pleasure.
For Matisse, painting was the rhythmic arrangement of line and color on a flat plane.
He had created the technique of striking contrasts, unmixed hues, flat planes of color (similar to Gauguin, 1848 – 1903, French)
expressive brush strokes (similar to Van Gogh, 1853 – 1890, Dutch).
Light was expressed, not in the method of the Impressionists, but with a harmony of intensely covered surfaces.

For additional information please visit: http://en.wikipedia.org/wiki/Henri_Matisse

PROJECT:reduce Matisse's Purple Robe and Anemonies down to simple geometric shapes and redraw.
Step1: begin to see the organic shapes as Geometric and redraw it accordingly
Step2: When you begin to draw, FILL YOUR PAGE
Step3: use mixed media to fill in the work
Markers
Oil pastels
Chalk pastels
Colored pencils

MATERIALS:
Poster of Matisse's work: Purple Robe and Anemonies
White paper
pencils

Tuesday, April 6, 2010

Jim Dine WATERCOLOR Hearts


Kindergarten
and First Grade
DISCUSSION: WATERCOLOR Techniques
Watercolors come in liquid form and cake form:
This is probably what you are used to using at home
The small ovals of Colors are called cakes
Professional watercolor artists use tubes of watercolors that they
place in a covered palette. They dry up and can be wet again and again
We are using liquid watercolors today
The come in bottles and they are very thin like water but
the colors are very vibrant
There are several important watercolor techniques and tricks that artists use.
Wet on dry watercolors means to have wet watercolors and paint onto dry
paper. This technique is easy to control the paint only goes where
you paint it.
Wet on Wet: is to paint wet watercolors on wet paper
This is less controlled and more dramatic
Wash: this is one color of watercolors applied in the wet on wet technique

ARTIST:
Jim Dine
born June 16, 1935
American pop artist.
He is sometimes considered to be a part of the Neo-Dada movement.
He was born in Cincinnati, Ohio,
He attended the University of Cincinnati and received a BFA from Ohio University
He first earned respect in the art world with his Happenings.
Pioneered with artists Claes Oldenburg and Allan Kaprow, the "Happenings" were chaotic performance art that was a stark contrast with the more somber mood of the expressionists popular in the New York art world.
In 1962 Dine's work was included, along with Roy Lichtenstein, Andy Warhol and Wayne Thiebaud, in the historically important New Painting of Common Objects.
This exhibition is historically considered one of the first "Pop Art" exhibitions in America
Jim Dine’s Hearts were included in this exhibit

for more information about Jim Dine please visit: http://en.wikipedia.org/wiki/Jim_Dine

PROJECT: Create Dine like hearts in both types of watercolors
Step1: Draw a heart
Step2: outline the heart in black oil pastels or Sharpie
Step3: using clear water wet the INSIDE of the heart
Step4: using all colors of liquid water colors fill in your hearts like Jim Dine
Step5: using wet on dry technique paint the background of your heart using one color you have not yet used
Step6: turn in your piece and clean your space

MATERIALS:
Liquid watercolors in all colors
Brushes
Water
Large watercolor paper
Oil Pastels or Sharpies

PROJECT ADDITIONS/ALTERNATIVES
:
You could incorporate warm and cool color discussion into this project by having the heart
be in warm or cool and the background be the opposite
You could incorporate Symmetry into this project by cutting symmetrical hearts to watercolor and pasting them into a washed background.

Friday, April 2, 2010

SHADING WITH WATERCOLOR and GEORGIA O’KEEFFE


6 grade-8 grade

DISCUSSION: WATERCOLOR Techniques:
Wet on Wet
Wet on Dry
Wash
Using a paper towel to control the paint

Pass out a photograph of a different flower to each student. I gave both Black and white and color photos so they could see all the details.

Ask each student to talk about their flower

ARTIST: Georgia O'Keeffe (November 15, 1887 – March 6, 1986)
An American artist.
O'Keeffe was a major figure in American art from the 1920s.
She received widespread recognition for her technical contributions, as well as for challenging the boundaries of modern American artistic style.
She is known for paintings of flowers, animal bones, and landscapes in which she synthesized abstraction and representation.
O'Keeffe played a central role in bringing an American art style to Europe at a time when the majority of influence flowed in the opposite direction.
This feat enhanced her art-historical importance given that she was one of few women to have gained entry to this level of professional influence.
She found artistic inspiration in the rural Southwest, particularly in New Mexico, where she settled late in life.

PROJECT: create a Georgia O'Keeffe Flower in watercolor
Tape your edges so you have a crisp white border around your watercolor
Step1: Draw your flower in a quick one minute blind contour drawing
FILL YOUR 12x18 page with the flower
Step2: Find the light parts of your flower and the dark parts of your flower
Step3: using watercolor techniques discussed begin to fill in your flower adding shade and tints
Step4: Finish your flower

MATERIALS:
Liquid watercolors
Paper towels
Pencils
Masking tape
Water
brushes

Complementary Collage with Eric Carle


Kindergarten-First grade

DISCUSSION: VALUE
Show an example of Eric Carle's work using light colors
how do we make colors lighter?
What new colors do we create?
How does his art a make you feel?
Show an example of Eric Carle's work using dark colors
How do we make color darker?
What new colors do we create?
At what time of day is it?

COMPLEMENTARY COLORS: opposite on the color wheel
Make things stand out, contrast

ARTIST: Eric Carle
1929-
American illustrator
Famous for him many children’s books including Brown Bear
Uses Collage to create his artwork

COLLAGE: pasting paper on top of each other to create a picture or background

PROJECT: Create a value collage using all values of one color
Step1: pick a color that you want to use
Step2: from a magazine find different values of that color and begin to glue them on
the paper
Step3: Use tissue and colored paper scrapes as well
Step 4: glue down the collage pieces by overlapping them on each other
Step5: fill the page with your color
Step6: find a complementary colored object glue it on your collage
Ex: blue collage Orange vase on top
Ex: green collage red purse on top
MATERIALS:
Scrap paper, tissue and magazines for color
Glue
Scissors
White paper cut in half